How to record your screen with audio on Mac
Recording your voice with the screen is built into every Mac. Recording the sound the Mac itself plays (a video, a call, an app's alerts) depends on your macOS version. Here's how to do both, and how to check you got the sound you wanted.
The short answer
Press Shift-Command-5, click Options, choose a microphone, then click Record. That records your voice with the screen. To record your Mac's own sound as well, choose Include System Audio in the same Options menu; Apple added it in macOS 27. On macOS 15 Sequoia and macOS 26 Tahoe the built-in tools record a microphone only, so you need an app such as Macsential to record the Mac's sound.
Record with the Screenshot app
QuickTime Player's File ▸ New Screen Recording (Control-Command-N) opens the same Screenshot tools.
- 1
Press Shift-Command-5 to open the Screenshot app.
- 2
Choose Record Entire Screen, Record Selected Portion or, on macOS 26 Tahoe or later, Record Selected Window.
- 3
Click Options and choose your microphone. On macOS 27 or later, also choose Include System Audio to record the Mac's sound.
- 4
Click Record. To stop, click the Stop button in the menu bar or press Command-Control-Esc.
- 5
Find the recording on your desktop: a .mov file named “Screen Recording” with the date and time.
Where it falls short
- Before macOS 27, it can't record the sound your Mac plays, only a microphone.
- There's no camera option, so showing yourself in a corner of the video takes another app.
- What you record is what you get: there's no zoom, background or captions to add afterwards.
Record with Macsential
Macsential records the Mac's sound on macOS 15 Sequoia and later, without installing an audio driver. Your microphone, the Mac's sound and your camera are saved as separate tracks, so you can still change them after recording.
- 1
Open Record Screen in Macsential's sidebar and choose Display, Window or Area.
- 2
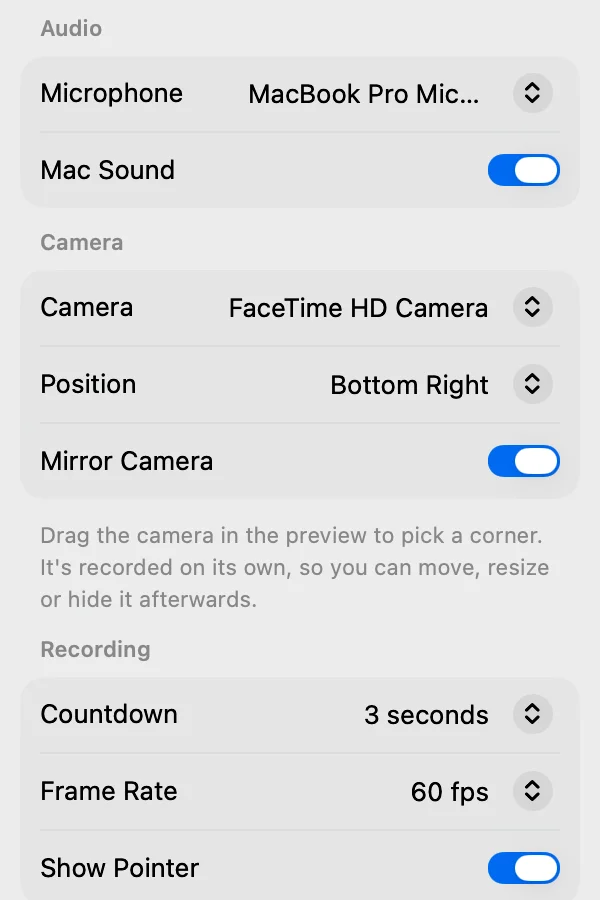
Under Audio, choose your Microphone and turn on Mac Sound. Choose a Camera too if you want to be in the video.
- 3
Click Record, or press ⇧⌘2 from any app. After the countdown, recording starts; press ⇧⌘2 again or click stop in the floating controls to finish.
- 4
Edit the recording: set the volume of each sound, mute parts, add music or captions, then export an MP4, a MOV or a GIF. Recordings are kept in Movies ▸ Macsential.
Microphone, Mac sound, or both
Choose the microphone when you talk over what you show: a tutorial, a bug report, a walkthrough for a colleague. Choose the Mac's sound when the screen makes the sound you want: a video, a game, an app's alerts, the other side of a call. Choose both for a narrated demo of something that plays sound.
With both on, keep the Mac's volume moderate or use headphones, so the microphone doesn't pick up the speakers too and you don't hear everything twice.
Check the sound before a long recording
Record ten seconds, stop, and play it back. It's much cheaper to find a muted microphone or a missing permission then than after a twenty-minute take.
If it doesn't work
- The recording shows only the desktop, or the app won't record
The app needs permission. Open System Settings ▸ Privacy & Security ▸ Screen & System Audio Recording and turn it on for the app you record with. Quit and reopen that app afterwards.
- There's video but no voice
No microphone was chosen, or the app can't use it. In the Screenshot app, check Options isn't set to None under Microphone. In Macsential, pick a microphone under Audio. Then check the app is allowed in System Settings ▸ Privacy & Security ▸ Microphone.
- Your voice is there but the Mac's sound isn't
On macOS 15 and 26, the Screenshot app can't record it. On macOS 27, choose Include System Audio in Options before you click Record. In Macsential, turn on Mac Sound. The Mac's sound is covered by the same Screen & System Audio Recording permission.
Related
- Screen Recorder Record your screen, camera and sound, then add zooms, backgrounds and captions before you export.
- MOV to MP4 Turn QuickTime and iPhone movies into MP4 files that play on Windows, Android and the web.
- Screen Studio vs Macsential: Mac Screen Recorders Compared Screen Studio vs Macsential: zoom, cursor, camera layouts, captions, export formats and pricing compared, with who should pick which Mac screen recorder.
- Screenshot Capture an area, a window or the screen, add a background, padding and text, or copy the text in it.
More guides
Questions
Can a Mac record internal audio without an app?
From macOS 27, yes: choose Include System Audio in the Screenshot app's Options. On earlier versions, the built-in tools record a microphone only.
How do I stop a screen recording on a Mac?
Click the Stop button in the menu bar, or press Command-Control-Esc. In Macsential, press ⇧⌘2 or click stop in the floating controls.
Where do screen recordings go on a Mac?
The Screenshot app saves them to your desktop as .mov files named “Screen Recording” with the date and time; you can change the place under Options ▸ Save to. Macsential keeps recordings in Movies ▸ Macsential.
Can I record the screen, my voice and my camera at the same time?
The Screenshot app has no camera option. Macsential records the screen, a microphone, the Mac's sound and a camera together, each on its own track, so you can move or hide the camera and change each sound's volume afterwards.
How do I turn a screen recording into an MP4?
The Screenshot app saves .mov files. See how to convert MOV to MP4 on a Mac; Macsential can also export a recording straight to MP4.
Last updated