How-to
How to Snap Windows on Mac Without an App
By Nguyen Truong Duy · · 6 min read
On macOS 15 Sequoia and later you can snap windows without installing anything: drag a window to the left or right edge of the screen, or press Fn-Control-Left Arrow or Right Arrow. The same layouts (halves, quarters, fill, center) are in the green button's menu and under Window ▸ Move & Resize.
The rest of this guide covers each of those ways step by step, the settings that change how they work, and the point where a window manager app is still worth having.
Snap a window by dragging it
- Drag a window by its title bar toward an edge of the screen.
- When the pointer reaches the edge, macOS shows a highlighted area where the window will go.
- Let go. The window fills that area.
Drag to the left or right edge for a half, and to a corner for a quarter. Drag a window up to the menu bar and it fills the desktop (not full screen: the menu bar and Dock stay). Keep dragging through the top edge and Mission Control opens instead.
If windows snap when you didn't want them to, hold the Option key while dragging instead: with Option held, macOS shows the tile area as soon as you move toward an edge, before the pointer gets there. That's handy on a large display, and you can turn off the plain drag behavior so only Option-drag tiles (see the settings below).
Use the green button menu
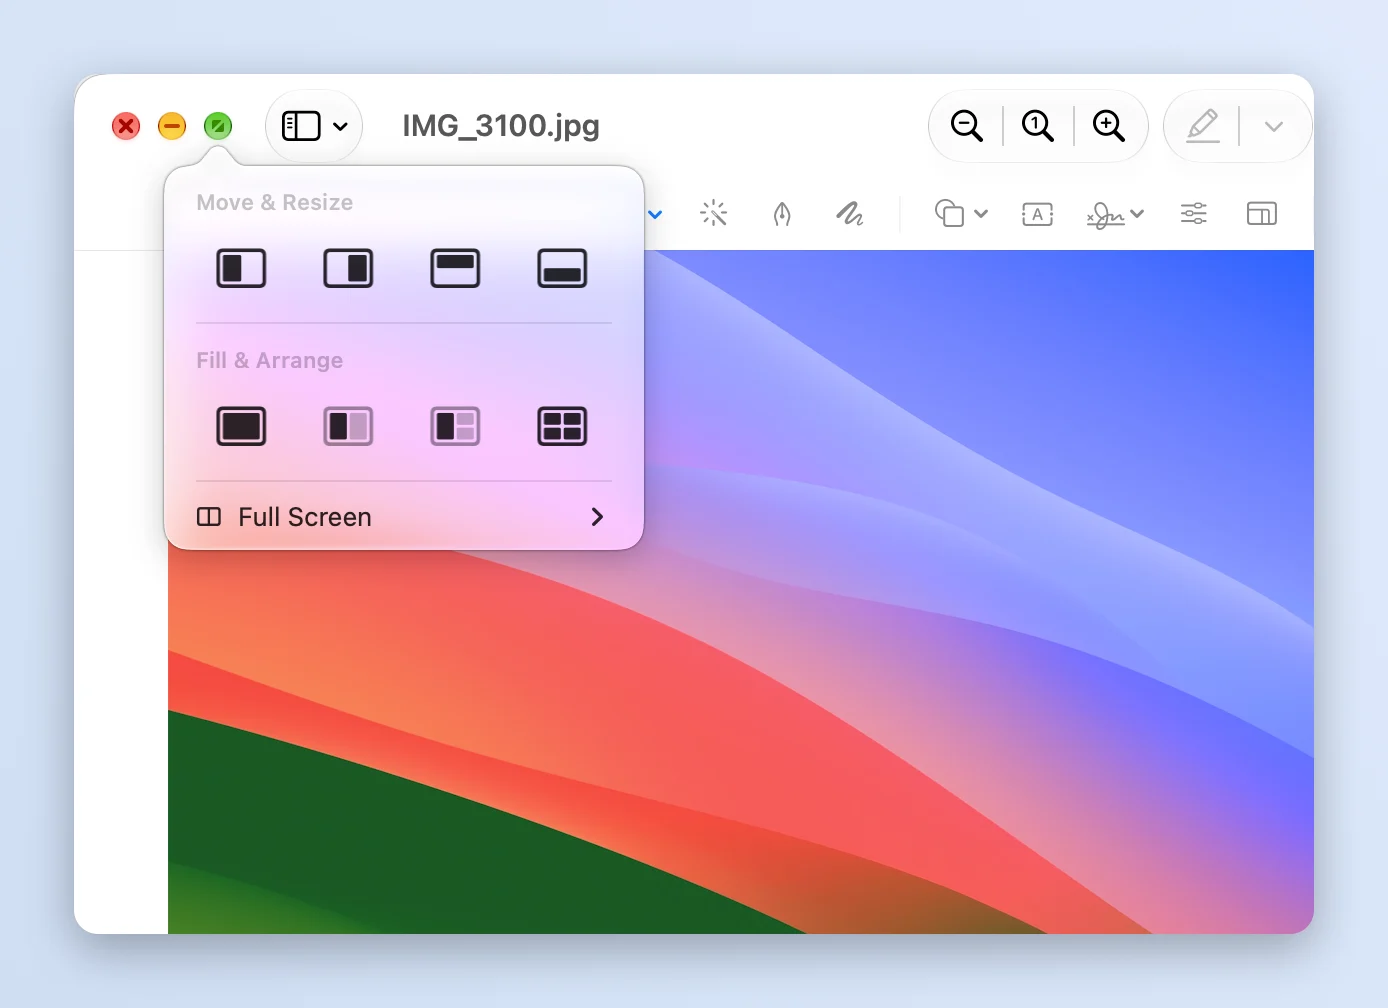
Hold the pointer over the green button in the top-left corner of a window (don't click it). A menu opens with two rows of layouts:
- Move & Resize places only this window: left, right, top or bottom half, or one of the four quarters.
- Fill & Arrange places this window and the windows behind it together, for example two side by side, or one half and two quarters. Its fill icon makes the window fill the desktop.
Press Option while the menu is open to see more layouts, such as Center. Below the layouts, Full Screen puts the window in full screen, alone or tiled with another app (what used to be called Split View).
Use the Window menu
Every app that has a standard Window menu gets the same layouts there:
- Click the window you want to move.
- Choose Window ▸ Move & Resize in the menu bar.
- Pick a layout under Halves or Quarters to place this window, or under Arrange to tile it with the windows behind it. Press Option to see more Arrange layouts.
The Window menu also has Fill and Center, and Window ▸ Full Screen Tile for a full-screen split.
Keyboard shortcuts for window tiling
These are Apple's shortcuts. Fn is the key in the bottom-left corner, labeled 🌐 or fn depending on your keyboard.
| Action | Shortcut |
|---|---|
| Left half | Fn-Control-Left Arrow |
| Right half | Fn-Control-Right Arrow |
| Top half | Fn-Control-Up Arrow |
| Bottom half | Fn-Control-Down Arrow |
| Fill the desktop | Fn-Control-F |
| Center | Fn-Control-C |
| Back to the previous size | Fn-Control-R |
| Left & Right (this window and the next) | Fn-Control-Shift-Left Arrow |
| Top & Bottom | Fn-Control-Shift-Up Arrow |
| Left & Quarters | Fn-Control-Option-Shift-Left Arrow |
The four quarters and the Quarters arrangement have no shortcut by default. The full list is on Apple's page Mac window tiling icons and keyboard shortcuts.
Change the shortcuts or add one for quarters
On macOS 27, open System Settings ▸ Keyboard, click Keyboard Shortcuts… and choose Windows. It lists the tiling shortcuts (Fill, Center, Tile Left Half and the other halves) and, under Quarters, Tile Top Left Quarter and the other corners, which have no keys set. Double-click a shortcut and press the keys you want; Restore Defaults brings Apple's back.
If your macOS doesn't have that list, you can try Keyboard Shortcuts ▸ App Shortcuts instead: click +, keep All
Applications, type the menu item's name exactly as the Window ▸ Move & Resize menu shows it (Top Left, Top Right,
Bottom Left or Bottom Right) and press the keys. App Shortcuts only reach menu items whose name matches, so if a
shortcut does nothing in an app, check the spelling against that app's menu.
Turn off the gaps between tiled windows
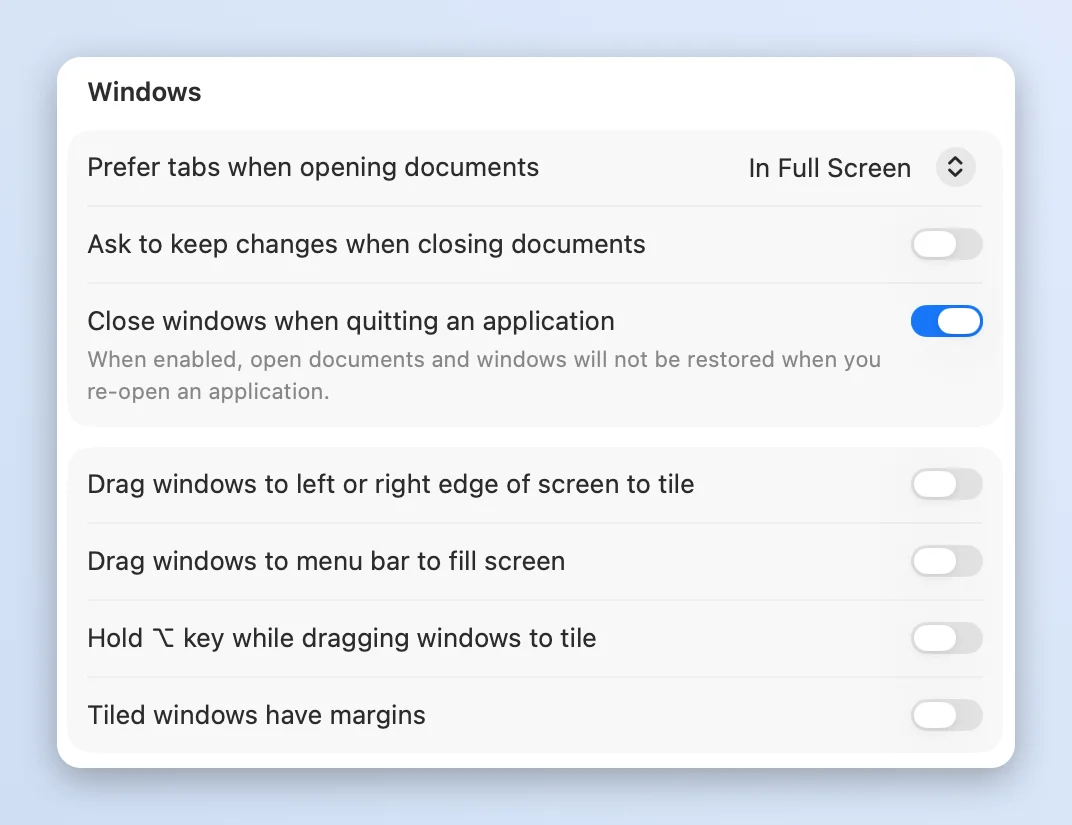
By default macOS leaves a margin around tiled windows. To make them touch the screen edges and each other:
- Open System Settings ▸ Desktop & Dock.
- Scroll to Windows.
- Turn off Tiled windows have margins.
The same section has the other tiling switches:
- Drag windows to screen edges to tile (on macOS 26 and later: Drag windows to left or right edge of screen to tile): turn it off if windows snap when you don't want them to.
- Drag windows to menu bar to fill screen.
- Hold ⌥ key while dragging windows to tile.
When the built-in tiling is enough
For most people, it is. If you work with two windows side by side, or a half and two quarters, macOS now does that with a drag or a shortcut, the margins can go, and Fn-Control-R undoes a snap. There's no reason to install anything for that.
Where it stops:
- No thirds. There's no left third, center third or two-thirds layout, which is what you want on an ultrawide or a 27-inch display: a browser in two thirds and notes in the last third, for example.
- Quarters need setup. The corners have no shortcut until you assign one yourself (see above).
- Moving between displays. There's no shortcut that sends a window to the next display and keeps its place.
- Small steps. No shortcut to make a window a bit larger or smaller.
The faster way with Macsential
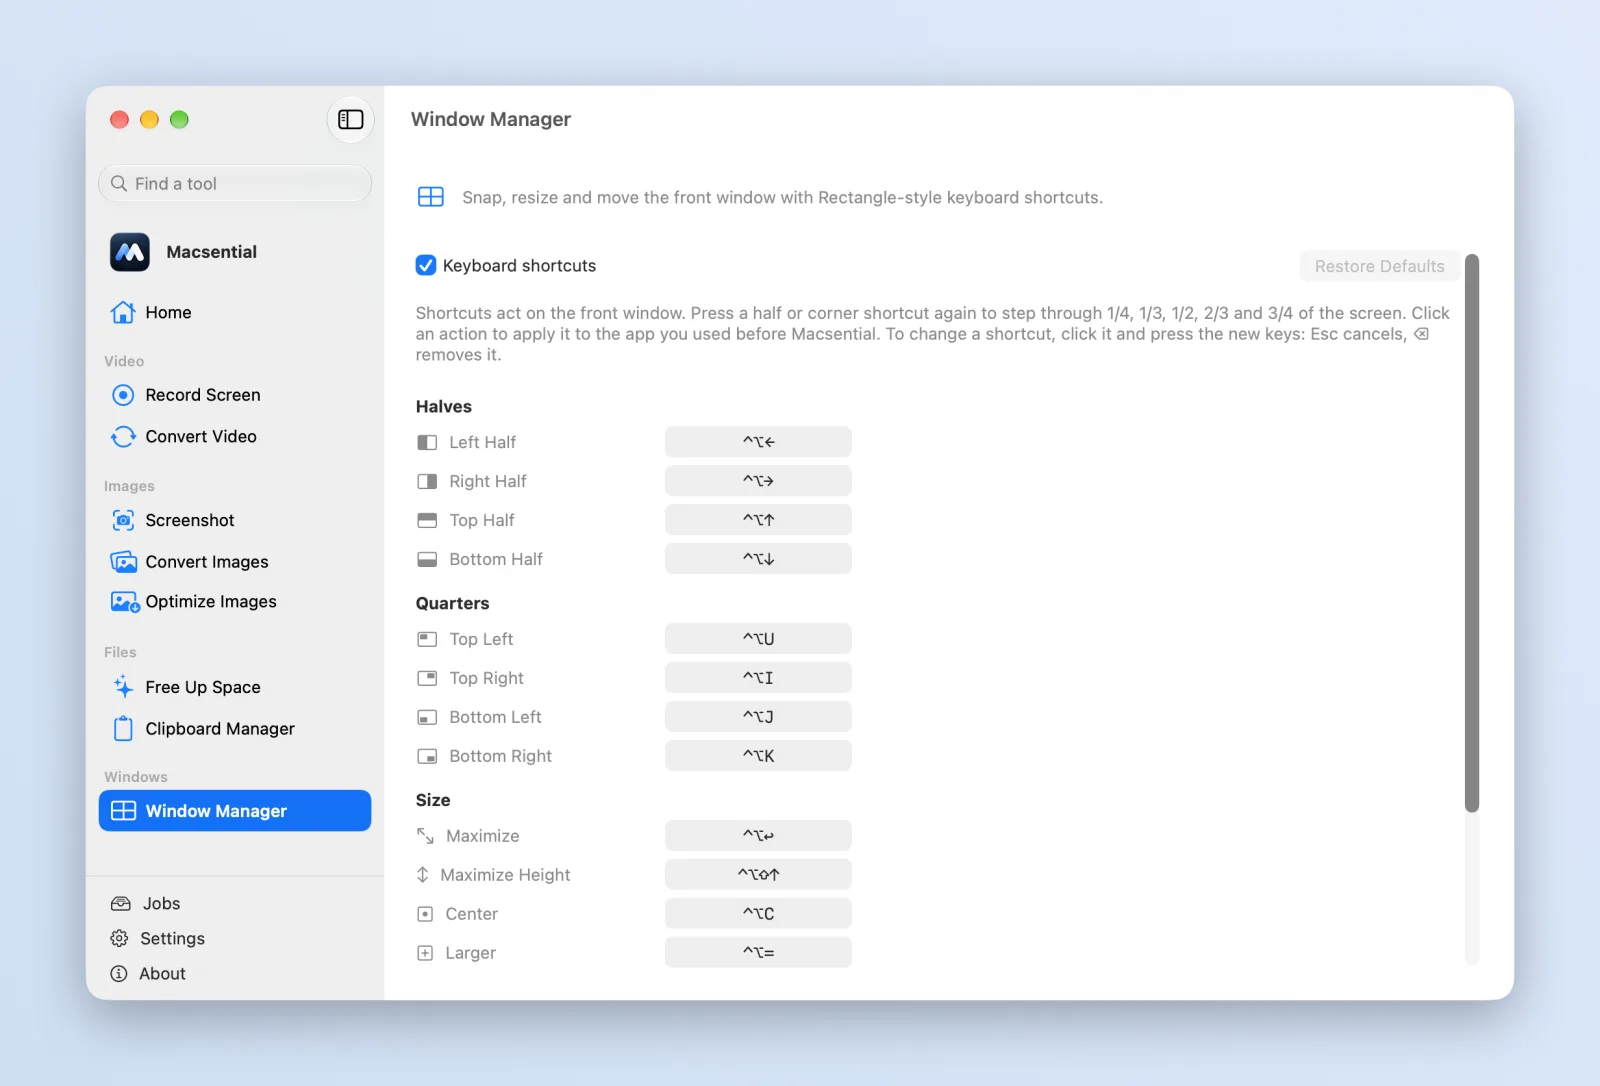
Macsential's Window Manager moves and resizes the front window with global keyboard shortcuts, and every shortcut can be changed. It covers what the built-in tiling leaves out:
- Halves and quarters, and thirds too: press a half shortcut again and the window steps through two-thirds, three-quarters, one-quarter and one-third of the screen.
- Maximize, Maximize Height, Center, Larger and Smaller (30 points at a time), and Restore, which puts a window back where it was before the first snap.
- Next Display and Previous Display, keeping the window's position and size relative to the screen.
The default shortcuts use Control-Option, so they don't collide with Apple's Fn-Control ones, and they match Rectangle's defaults if you're coming from it:
| Action | Default shortcut |
|---|---|
| Halves | Control-Option-Arrow keys |
| Quarters | Control-Option-U, I, J, K |
| Maximize | Control-Option-Return |
| Center | Control-Option-C |
| Restore | Control-Option-Delete |
| Next / previous display | Control-Option-Command-Right / Left Arrow |
To change one, open Window Manager, click its shortcut and press the new keys (Esc cancels, Delete removes it). If another app already uses a combination, Macsential marks it so you can pick another. You can also click any layout on the page to apply it to the app you were using before.
Window Manager needs Accessibility permission (System Settings ▸ Privacy & Security ▸ Accessibility), which is how any app moves another app's windows; Macsential asks for it the first time. It doesn't add drag-to-snap or its own margins: for dragging, keep using macOS's tiling, which works alongside it.
Window Manager is one tool in Macsential, next to screen recording, styled screenshots and image conversion. It's a one-time purchase (pricing); download it here.
FAQ
Does macOS have window snapping built in?
Yes, since macOS 15 Sequoia. Drag a window to a screen edge, use the green button's menu, Window ▸ Move & Resize, or Fn-Control-Arrow keys. Older versions only have full-screen Split View.
Why doesn't window tiling work on my Mac?
Check that you're on macOS 15 or later and that the switches in System Settings ▸ Desktop & Dock ▸ Windows are on. If those switches are dimmed, turn on Displays have separate Spaces further down the same page, under Mission Control: macOS 27's System Settings says window tiling requires it. Some apps with their own window menus or fixed window sizes can't be tiled, or only partly.
How do I snap a window to a third of the screen on Mac?
macOS can't do it on its own. You need a window manager app; in Macsential, press Control-Option-Left Arrow, then keep pressing it: the window goes from half to two-thirds, three-quarters, one-quarter and then one-third. With a window already on the left two-thirds, Control-Option-Right Arrow fills the last third in one press.
How do I remove the space between tiled windows?
Turn off Tiled windows have margins in System Settings ▸ Desktop & Dock ▸ Windows.