How-to
How to Remove Location Data from Photos on Mac
By Nguyen Truong Duy · · 7 min read
To remove location data from a photo on a Mac, export it from Photos with Location Information unticked, or open the file in Preview, press ⌘I and click Remove Location Info in the GPS section of the Inspector's ⓘ tab. For a whole folder of files, use exiftool in Terminal or an app that strips metadata in batches.
Every photo taken on an iPhone with Location Services on carries GPS coordinates in its EXIF data, often precise to a few meters. Some sites remove it on upload, but email attachments, AirDrop, cloud links and many forums send the file as it is. Below are the built-in ways to remove it, when each one is enough, and how to do a batch.
Check whether a photo has a location
Before you remove anything, check what the file holds:
- Preview: open the photo, choose Tools ▸ Show Inspector (⌘I) and click the ⓘ (More Info) tab. If a GPS section appears, with the latitude, longitude and a small map, the photo has coordinates. No GPS section means no location. On recent macOS the tab has collapsible sections (General, Exif, GPS and so on); older versions showed GPS as a separate tab.
- Photos: select the photo and press ⌘I. The Info window shows a map when the photo has a location.
- Terminal:
mdls -name kMDItemLatitude -name kMDItemLongitude photo.jpgprints the coordinates Spotlight read from the file, in decimal degrees (west and south are negative), for JPEG and HEIC alike.(null)means no location, or that Spotlight doesn't index that folder;exiftool -gps:all photo.jpg(see below) reads the file directly.
In Photos: hide the location, or leave it out of exports
If the photos live in your Photos library, Photos has two controls.
Hide Location
- Open Photos and select one or more photos.
- Choose Image ▸ Location ▸ Hide Location.
The photo no longer shows its location in Photos. Apple doesn't spell out what exported copies of a hidden-location photo contain, so check one with the methods above before you send it. The coordinates stay in your library, so you can bring them back with Image ▸ Location ▸ Revert to Original Location. Use it for photos you never want to share with a location, like ones taken at home.
Untick Location Information when you export
- Select the photos.
- Choose File ▸ Export ▸ Export [number] Photos.
- Under Include, untick Location Information.
- Click Export and choose a folder.
The exported copies have no GPS coordinates; the originals in your library are unchanged. Two limits: Export Unmodified Original doesn't offer the checkbox (its only metadata option is Export IPTC as XMP), because it hands you the file exactly as it was imported, and this only removes the location. The capture date and camera model stay.
Turn it off for everything you share
Photos ▸ Settings ▸ General has an Include location information option in its Sharing section. Apple describes it as covering photos you share or export, so untick it and Photos leaves the location out of those. This is the right setting if you rarely want to share a location at all. Apple doesn't say whether it also applies to photos you drag from Photos to the Finder, so check those files before you send them.
When Photos is enough: the photos are already in your library, and you export or share them from Photos. It's not much help for files that are already in a folder, a download or a project.
In Preview: remove location from one file
For an image file outside Photos:
- Open the photo in Preview.
- Choose Tools ▸ Show Inspector (⌘I), or click the ⓘ button in the toolbar, then click the ⓘ (More Info) tab.
- Open the GPS section. Below the coordinates and the map, click Remove Location Info.
- Close the window or choose File ▸ Save to keep the change.
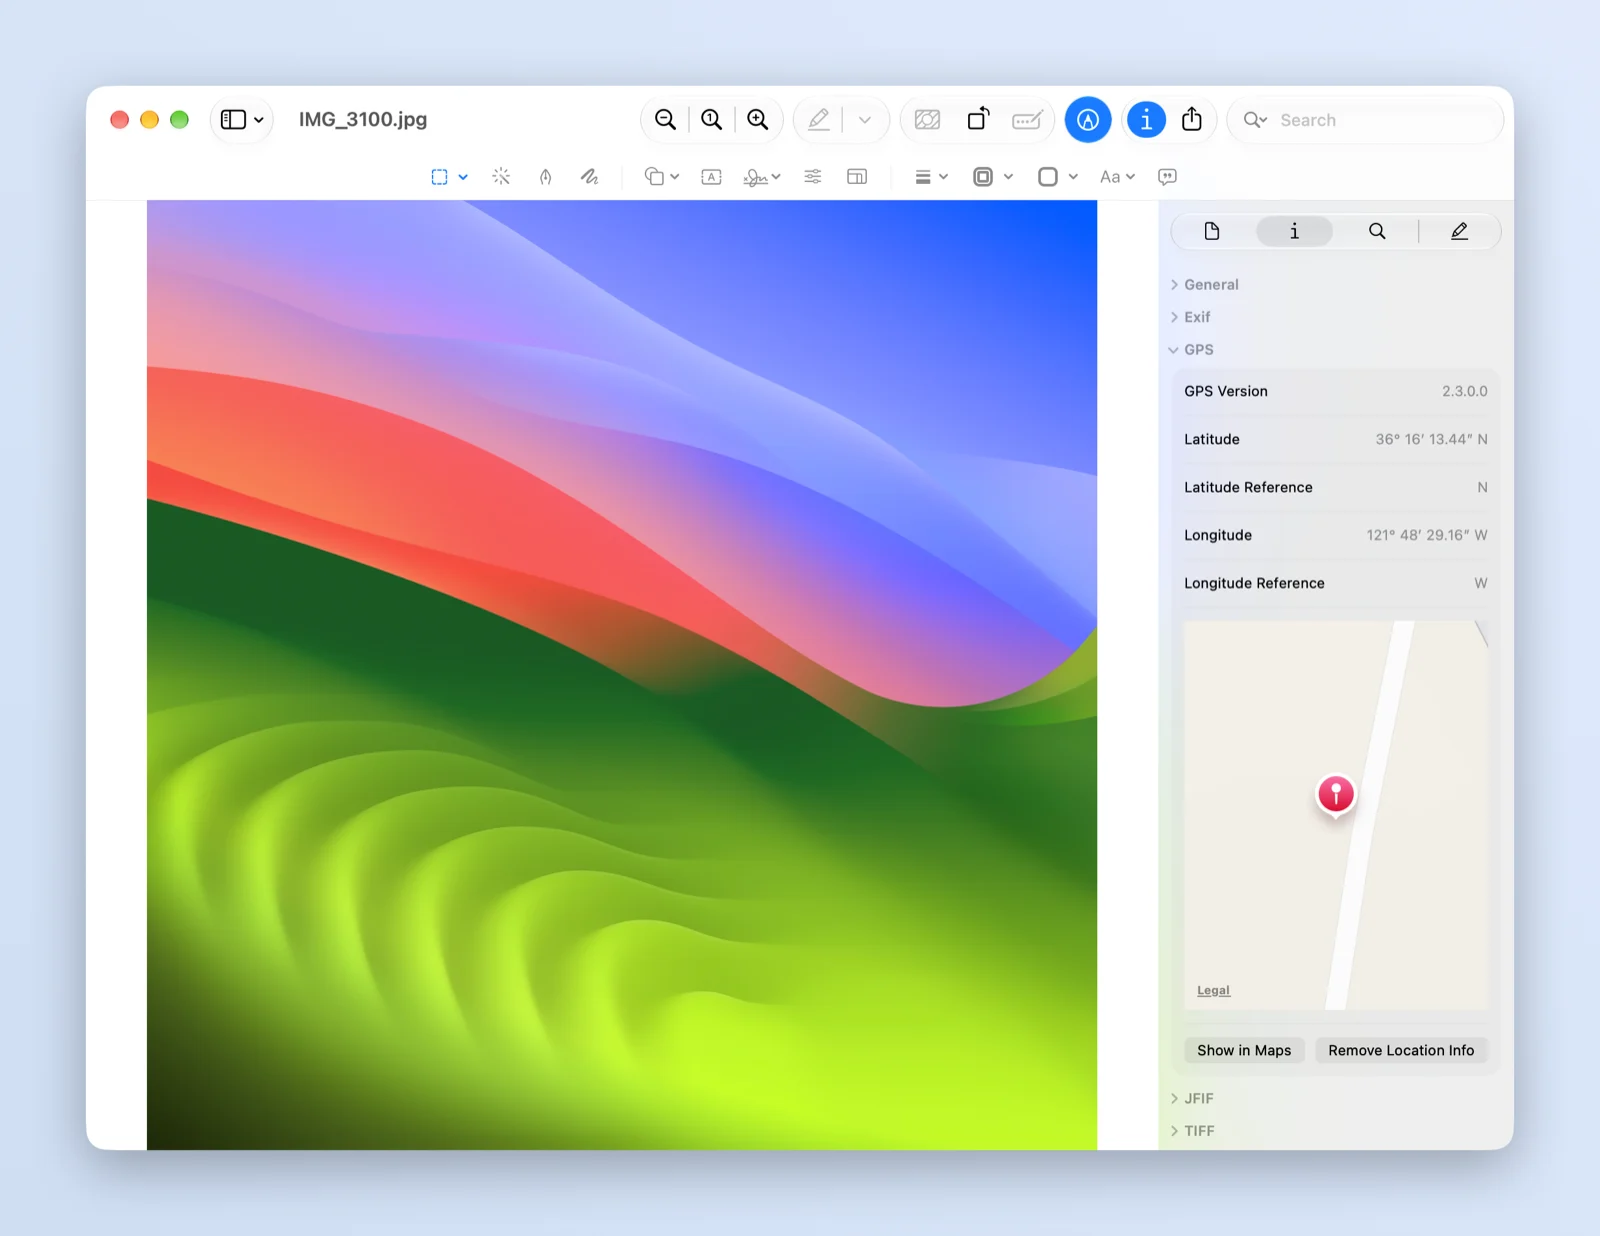
This edits the file in place, so work on a copy if you want to keep the original. It also only removes the location: the date, camera and lens stay. You can select several images in the Finder and open them in one Preview window, but you still remove the location one image at a time.
One thing that confuses people: if you remove the location in Preview and then import the file into Photos, Photos may treat it as a duplicate of the original already in your library and keep showing the old location. Delete the original from Photos first, or use Hide Location instead.
When Preview is enough: a few files, and you only care about location.
In Terminal: exiftool for whole folders
ExifTool is the free, standard command-line tool for image metadata. Install it with Homebrew (brew install exiftool) or the macOS package from its website.
Remove GPS data from every JPEG, HEIC and PNG in a folder and its subfolders:
exiftool -gps:all= -xmp:geotag= -r -ext jpg -ext jpeg -ext heic -ext png ~/Desktop/to-share
-gps:all= deletes the EXIF GPS block and -xmp:geotag= the GPS tags some apps write into XMP. ExifTool keeps each original next to the new file as photo.jpg_original; add -overwrite_original once you trust the command.
To remove all metadata (date, camera, lens, software, location) but keep the color profile, so colors don't shift, and the orientation, so photos don't turn sideways:
exiftool -all= -tagsfromfile @ -icc_profile -orientation -r -ext jpg -ext jpeg -ext heic -ext png ~/Desktop/to-share
Without -orientation, a JPEG shot in portrait loses its rotation flag and shows up sideways. HEIC files keep their rotation outside the EXIF data, so they're fine either way. ExifTool prints an "ICC_Profile deleted" warning for each file; -tagsfromfile @ -icc_profile copies the profile back, so you can ignore it.
Check the result with exiftool -gps:all photo.jpg, which prints nothing when no GPS tags are left.
When exiftool is enough: you're comfortable in Terminal and want exact control over which tags go. It's the most thorough option here.
With Macsential: strip metadata from a batch, without Terminal
Macsential does this in its image tools, on your Mac, with no upload. It works on copies, so the originals stay untouched, and you can drop in a whole folder's worth of files at once.
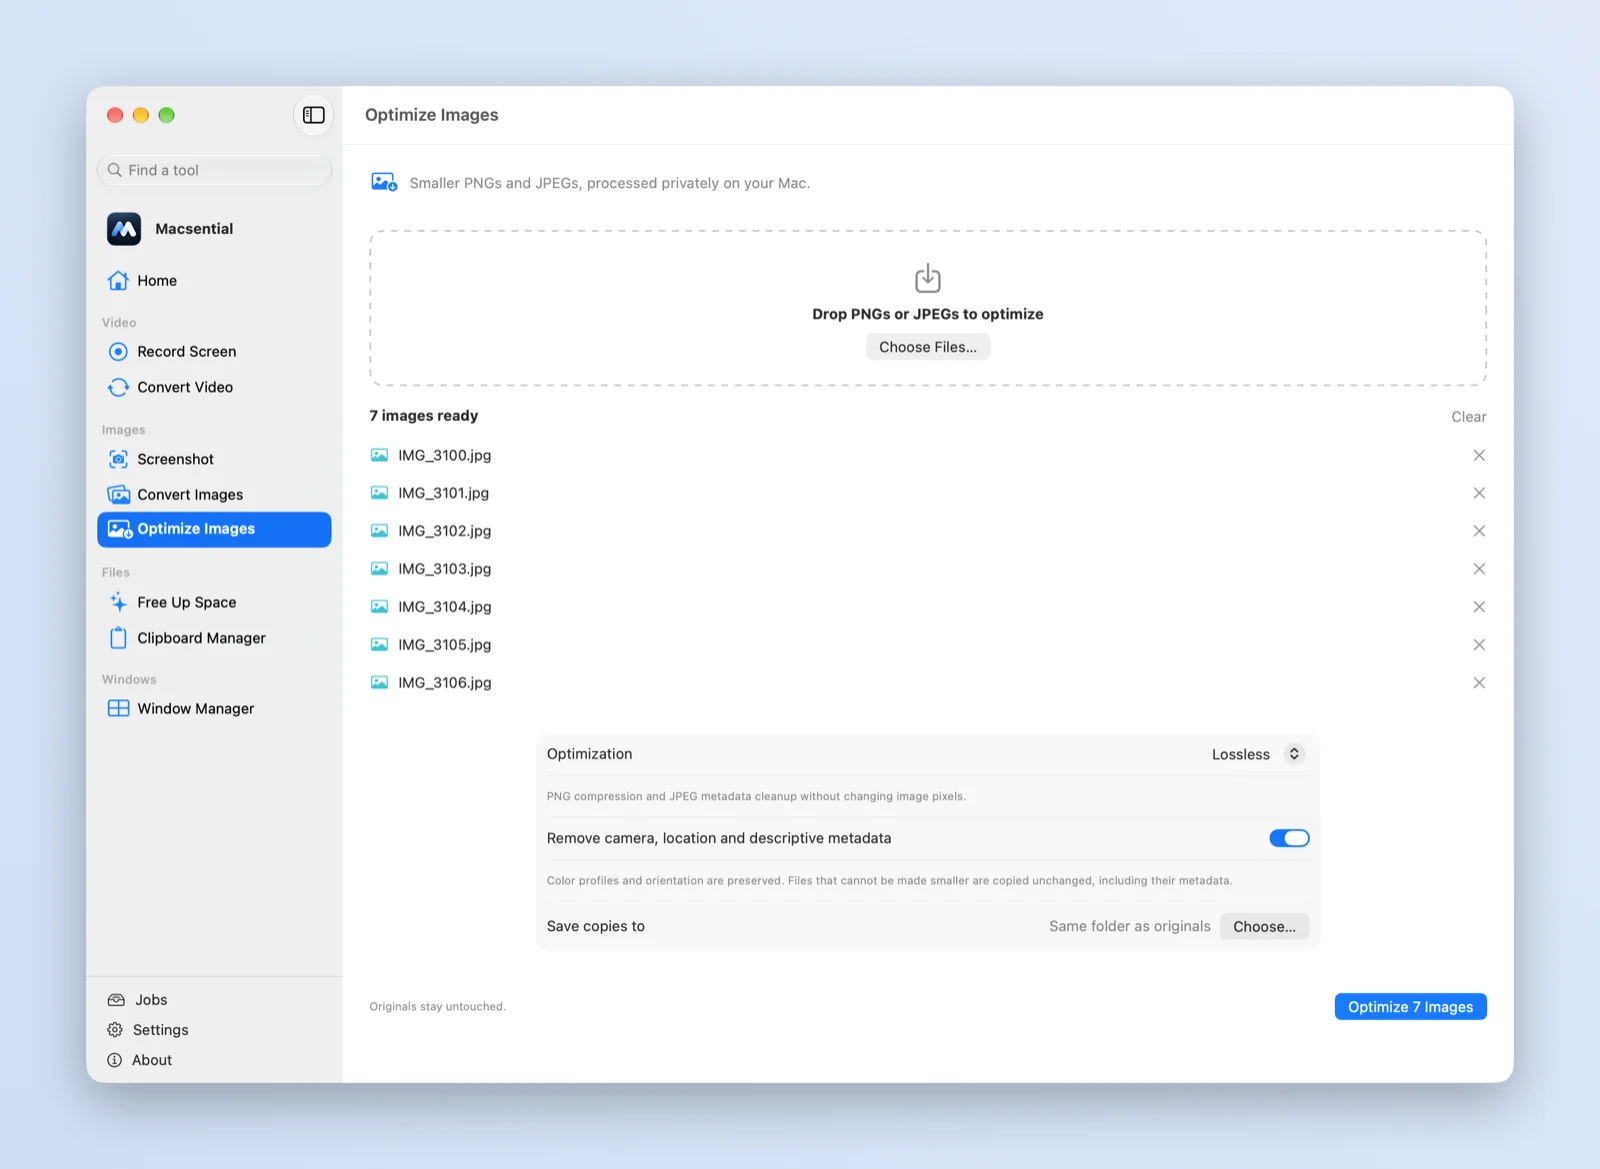
JPEG and PNG: Optimize Images.
- Open Optimize Images and drop your JPEGs and PNGs on it.
- Leave Lossless selected and Remove camera, location and descriptive metadata on (both are the defaults).
- Click Optimize (the button shows the count, like Optimize 7 Images). Optionally pick a folder under Save copies to first.
Each image is saved as a copy named photo (optimized).jpg. JPEGs aren't re-encoded: Macsential removes the EXIF, XMP and other descriptive blocks (GPS, date, camera, comments) and keeps the compressed image data byte for byte, along with the color profile and the orientation, so photos don't turn sideways. PNGs lose their text and EXIF chunks and are recompressed losslessly. The files usually get a little smaller too.
From the Finder it's even shorter: select the images, right-click and choose Quick Actions ▸ Optimize Images. It runs in the background with the same defaults, saves the copies next to the originals and sends a notification when it's done.
One limit to know: some JPEGs contain extra embedded images (an MPF segment), and Macsential copies those unchanged rather than risk breaking them, metadata included. Examples are JPEGs from newer iPhones that store an HDR gain map (one from an iPhone 15 Pro Max we checked had it, while older iPhone 11 and 12 JPEGs didn't) and many camera JPEGs with a large embedded preview. The results list shows them as "No size reduction". Check those files in Preview, or run them through exiftool.
HEIC, TIFF and WebP: Convert Images. Open Convert Images, choose the output format, and turn Keep metadata off. The copies are written without EXIF or GPS data. This re-encodes the image, so pick a quality for lossy formats; it's also the way to go if you're converting HEIC to JPG for sharing anyway.
Macsential removes all descriptive metadata, not just location; there's no "location only" option. If you want to keep the capture date, use Photos' export checkbox or the first exiftool command. See pricing or download it.
FAQ
Does AirDrop or Messages remove the location from a photo?
Not by default. On an iPhone with iOS 26 or earlier, tap Options at the top of the share sheet and turn Location off before you share; the share sheet then shows "Location Not Included", and Apple says to share with any of the methods it offers, AirDrop and Messages among them. Apple's iOS 27 guide no longer lists this switch, so look for it under Options on your iPhone. On a Mac, Photos' Include location information setting controls what Photos shares; a file shared from the Finder goes as it is.
Do screenshots have location data?
No. Mac screenshots don't record GPS coordinates. Photos taken with a camera or phone are the ones to check.
Does removing location data lower the photo quality?
Not with exiftool or Macsential's lossless Optimize Images: they change metadata, not pixels. Photos' Export Photos writes a new JPEG, TIFF or PNG at the quality you choose, and converting to another format re-encodes the image too, which can lose a little detail in lossy formats.
How do I stop my iPhone from adding location to new photos?
On the iPhone, open Settings ▸ Privacy & Security ▸ Location Services ▸ Camera and choose Never. Photos you take from then on have no location; earlier photos keep theirs.